
2021.05.26
What You Should Already Know
- Basic JavaScript.
- Basic familiarity with Jira.
- Basic Familiarity with Zephyr Scale.
- How to create API requests in Postman with variables.
- How to write basic tests in Postman.
What You Should Have
- Access to a free or paid account on Jira and the Zephyr Scale plugin, or app.
- Your authorization token from Jira/Zephyr, ideally already stored in Postman as a variable.
- Access to a free or paid API to experiment with, like Postman’s Echo API. https://postman-echo.com/
Let’s Begin
One of the things I’m known for saying often is, “Don’t put your planes in the air until they have a place to land.” With this in mind, the first thing I did is create a place to record all my results, a landing strip if you’ll follow the metaphor.
- I created a free Jira account and a project named Jira. The name isn’t that important here. What’s important for this tutorial is the project’s key, “JIRA”.
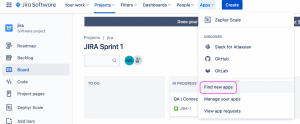
- I added the Zephyr Scale app to my project.
- I created a Zephyr Test Cycle named Jira Cycle 1. The name isn’t that important here. What’s important for this tutorial is the cycle’s key, “JIRA-R1”.
- I created a Test Case, where I would post my results, named ECHO GET https://postman-echo.com/time/now. The name isn’t that important here. What’s important for this tutorial is the test case’s key, “JIRA-T1”.
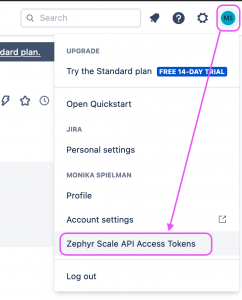
Next, I reviewed the Zephyr Scale API Documentation.
Using this documentation, I learned what I needed to use Postman to just POST an execution result to Zephyr. Before adding the complication of my own API, I made sure I could post results via Zephyr’s API.
- I made sure my Zephyr bearer token was safely stored in a Postman variable.

- I created a POST request to the Zephyr end point with this JSON in the body the body.
POST to https://api.adaptavist.io/tm4j/v2/testexecutions
{
  "projectKey": "JIRA",
  "testCycleKey": "JIRA-R1",
  "testCaseKey": "JIRA-T1",
  "statusName": "pass",
  "testScriptResults": [
    {
      "statusName": "pass",
      "actualResult": "Executed and Posted directly by Postman M1 Request"
    }]
}
Let’s unpack that JSON a bit. Notice the first 3 key:value pairs.
projectKey
testCycleKey
testCaseKey
Those are the important bits of what I setup earlier in the Zephyr Scale App on my Jira project. It’s easy to mix them up, so attention to the details is important.
The next key:value pair, statusName, is the overall status of the test; pass, fail, etc.
The next key:value pair is testScriptResults. Depending on how you write your test cases in Zephyr, this could be an array of several objects that correspond to the Test Steps you defined in your Test Case. I usually only have 1 object because I don’t keep track of individual steps pass/fail, just the over all result. For me, the statusName is a repeat of the overall status of the test; pass, fail, etc.
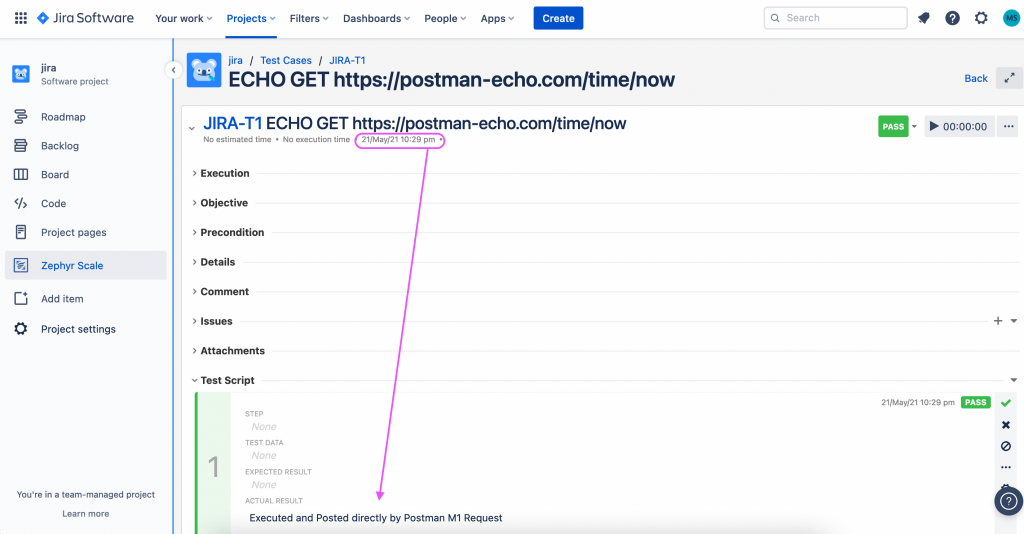
The second key:value pair in the testScriptResults object is something I use to record specific information about the Test. By using variable from the actual test cases, this string of text gives me confidence that what I think happened really happened, and will help trouble shoot unexpected results when they occur.
This is what I do for my project. Review the Zephyr Scale documentation for more possibilities for your own work.
After I check my work in Postman, I send the POST request.

Pro-tip: When you check your work in Postman, via the button that’s </>, you can change what language the Request is written in. The default is a basic cURL. You can change it to something like Python, if you want to bail on the next half of the tutorial and use the Python Requests library for your reporting.
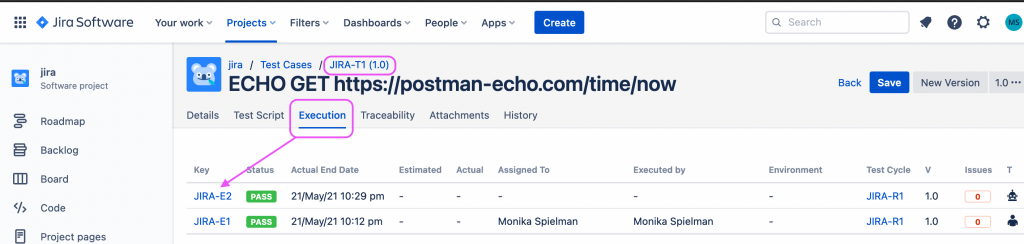
And then I check my work in Zephyr. I visit the list of Test Cases and click on the Case being tested, T1 in this example. Under the Test Case Name, there are several tabs, one of which is labeled “Executions.” Your most recent execution should be at the top of the list of all executions for this test case.
Remember, I didn’t actually make the API request the Test Case describes yet. I just used Postman to build the Request for Zephyr’s API.
Stay tuned for Part 2 of this tutorial, where I will take what I’ve done here and incorporate it into the Tests of another API request.